He111
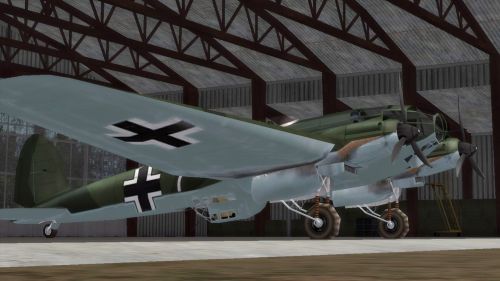
Heinkel He 111H-2
History
Delivered into the Luftwaffe air forces in 6 He 111 (together with the Do-17 and Ju-86) was one of the first really modern level bomber deployed by the Luftwaffe and over all superior to all other air forces aircraft, let alone bombers! Over time improvements to its design eventually allowed it to deliver 2000kg and larger bomb loads anywhere in Continental Europe from central Germany, and preferably without the need for fighter escort. While the requirement to be capable of unescorted bomber missions was realized the day the first example was flown in 1936, by 1940 speed and firepower of new fighters, including both the RAF's Spitfire and Hurricane fighters it would encounter over Britain and the English channel, proved that the He 111 could not operate unescorted any more.
The type modeled in game is the H-2 variant. Initially unarmored and only 3 fast firing MG-15 defenisve guns, later production units quickly gained 2 more MG-15's with other improvements, and with kits installed at the bomber fields during the crash upgrade program. Thus was first shock to the Luftwaffe on how quickly advanced war machines can be surpassed.
While slow and lumbering, its docile handling due to its massive wing area makes it an exceptional level bomber. With 5 MG-15 gun positions covering a wide area the He 111 can defend itself if the chips are down, and in cooperative formations with fighter escort the He 111 can really do a lot of damage through having a large bomb load. Another virtue is its tough structure, making it very resistant to damage done by small rifle caliber bullets; however it cannot defend alone and needs to be escorted by fighters and stay close together with other He-111's in a defensive formation.
Using this bomber in the game in a formation can be extremely rewarding, providing some of the most realistic experiences in the game. To get the most out of this game play, you will need to watch for calls for factory or RDP bombing, and join at least several missions, as rarely its the first one successful.
Game Play
Flying the bombers of Battleground Europe is a completely different mindset than almost anything else. It's much more the “big picture” in essence than is generally encountered in other areas of the games play. You’ll find that there is an average level of coordinated play with other players that exceeds that of most other areas of the game from a general perspective.
Never take a He 111 out alone if you want to be really effective. Alone they do not survive long at all and rarely make their targets. The real fun of flying this plane on bombing missions is doing it in enormous formations with lots of other bombers and escorting fighters along for the fun as well as the protection.
Team up with other air brigade members with a specific goal and request fighter escort. Bring along a buddy to man the guns and drop the bombs to really increase your odds of hitting the target and getting home. The He 111 level bombsight is very accurate if used correctly, take the time to use the bombing guide in the printed and online manuals and practice offline until you are proficient. Another popular method is dropping in formation on the leader's cue without individual bombsight calculations, which can be very effective and allow you to drop without detailed use of the sight. This is especially useful when bombing larger targets like the RDP factory installations.
Probably the most important role for the strategic level bombers in Battleground Europe is the destruction of the enemies RDP facilities. Slowing the output of their RDP factories will increase how long they must wait for the newer and more capable weapons they are developing and reduce the number of weapons available to their supply systems in game.
Inside the He 111
When doing a mission you will need to use most of these instruments to hit your target. Happily, most of it is obvious, so you can quickly get in to the game.
Pilot Instruments
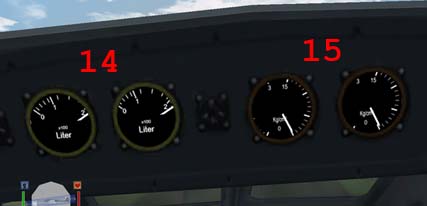
Here is a screenshot of the He 111 control panel, with numbers corresponding to the instrument descriptions below. There are also two more indicators (14 and 15) that you must look up over the pilots right shoulder (Mouse look or keypad 5 and 6 keys at the same time) in order to see.
Marked Instruments are:
- "Course Pointer" ("Kurszeiger"), a.k.a "PDI"
- This instrument informs how much left or right the pilot has to turn the bomber to align with target. The bombardier keeps aim on target with the cross hairs in the sight, and the pilot then turns toward the pointer until pilot sees it cenetered. The range of the pointer is up to 22.5 degrees either side. [As pictured indicates that the target is dead ahead.]
- Artificial Horizon
- This instrument indicates the plane's pitch (up-down) and roll (left-right) in relation to the horizon.
- Turn and Slip Indicator
- "Turn and Slip Indicator" (commonly known as Turn and Bank Indicator") shows both the rate of turn and the coordination (slip or skid) of the turn. The rate of turn is the actual rate at which the airplane is changing its heading, with tick marks showing a 'standard rate turn'. The "ball" in the curved tube is the Inclinometer and indicates the "slip" or "skid" of the aircraft, with the ball being centered meaning it is a perfect turn (if not, the aircraft looses lots of speed from excess drag).
- Climb / Descent Rate Indicator
- This instrument indicates how many M/S (meters per second) the plane is climbing or diving. As pictured it shows that the plane is in level flight (not moving upwards or downwards).
- Airspeed Indicator
- This instrument shows your current airspeed in kilometers per hour. It is labeled at 100 km/h intervals, each large tick is 50 km/h.
- Altimeter
- This indicates the planes current height above sea level. The number window in the bottom represents 1000m units (number center or LEFT OF CENTER tells which x000) up the plane is, and the dial represents 10's of units in meter altitude (Pictured indicates an altitude of 100m above sea level).
- "Slave" compass
- In the aft of the aircraft is a "Master" gyro compass mounted in a spring floating cage. Signals from it are displayed on this instrument, and provide a more stable reading then a magnetic compass.
- Magnetic Compass
- The number in middle is your compass heading, ADD 0 TO NUMBER. 36 (360) North, 9 (90) East, 18 (180) South, 27 (270) West.
- Inclinometer / Slip Indicator
- This indicates the slip of the plane, as found on #3. A spare Inclinometer.
- RPM Indicators
- These instruments indicate the RPM's of both engines. This instrument is not of particular importance as far as I can tell.
- ATA Indicator
- VITAL INSTRUMENT! This instrument indicates your ATA, or engine power, settings. For formation flying, the lead has to announce power settings for fellow pilots to keep formation. Example: "Max 1.0" means MAX for propeller, and "1.0" on the ATA gauge (needle straight up is 1.2). On the ground the Max power is about 1.32ata.
- Oil Level Indicators
- During flight it slowly goes down (moves left). If your engine is hit this movement is accelerated (and gray smoke pours out of the engine). Once you run out, your engine will die almost immediately (in real He-111 is an Coolant Temperature indicator).
- Oil Temperature Indicators
- These dials indicate the temperature of both engines. NOTE! The needle always reads at its MAX level, the He-111 engine will not overheat (even with "WEP" on).
- Fuel Level Indicators (located above head)
- This is your fuel quantity, 1 tank will empty before the other will. Note that 1/2 a tank of fuel is NOT geometrically 1/2 way between 0 and 2, it is at the point labeled '1'. One tank will empty first, and you have plenty of fuel for any mission.
- Oil Pressure Indicators (located above head)
- Important for a smooth running engine! When your oil is gone (#13), then this needle will drop to 0, and engine will start making scary noises.
Important Keymapper Settings
Preflight and Takeoff
Preflight
When you initially spawn in you need to do some settings.
- First of all, set your prop from Econ to MAX (' key)
- Trim UP 35 times (K key), this will give you the best climb rate once you up to speed (250km/h, AoA=1.0)
- IF you have customized the flaps, you may drop them 20% but do not use full (100%) flaps since it makes it harder to take off
- Go to map and set way-point, or if mission leader, set way-points.
- NOTE on AF where you are located, so you can find where is best place to start you takeoff.
- IF you took crew, make sure they are in game and responding before you start engine.
Starting Up The Engines
Starting the engine is pretty standard across all planes:
- Throttle as far back as you can so that we don't take off running as soon as the engine starts.
- Next hold down both wheel brakes ('Z' and 'X' by default), and start the engine. The reason we hold down the wheel brakes is to keep the plane from rolling off down the runway as soon as we start up the engines.
- Tap the 'E' key to start them! Note: Often one engine will start a lot sooner than the other. Just wait until both engines are running smoothly before going to taxi, or you’ll end up spinning in little circles.
Taxiing
- First, find the end of the runway that you want to get to. Normally this will be at one of the corners of the runway. If you're forming up with a group of bombers, look around to find them on the runway.
- Most default "spawn in points" often have obstacles directly in your path! The plane cannot get enough speed in time to lift above the trees, AA pits, HANGERS, or other obstacles at the far end, so you need to taxi to a corner that will give you the longest clear patch to take off.
- Press the '/' key to unlock the tailwheel. This allows the rear of the plane to swing freely back and forth on the ground to assist in turning the plane at low speeds. Be sure you re-lock the tailwheel once you are pointed the direction you want to go, or you will be the topic of radio chat.
- Release the wheel brakes (you still have them held down right?) and throttle up some to get yourself rolling, but ONLY for a moment, otherwise you'll probably end up going too fast. Be patient and taxi your way over to the end of the runway you've chosen.
- You can turn the plane by gently tapping the wheel brake in the direction you want to go. Tap the opposite wheel brake to stop yourself from turning. You can release the wheel lock to let the plane turn more easily, and lock the tail wheel and apply brakes to quickly stop the airplane from spinning.
- Its important to keep your speed under control, be patient and take your time getting to the other end of the runway. Getting to the end of the runway isn't any good if you can’t stop in time, or if you dip a wing into the dirt before you get there.
- Pull in behind the planes you’re forming with (or as far as you can towards the edge of the runway if you’re alone) and point the plane in the direction of the longest clear path.
- Once you’re lined up, hold the wheel brakes again and kill the engine.
- Keep an eye out for AI pits, bunkers, and the fueling depots on the runway. You don’t have to worry about the other planes, you won’t take any damage if you pass through them.
Preparing For Takeoff checklist
- Did you set your trim (35 x 'K' key)?
- Check that you have the tailwheel locked. If you don’t, then when you take off the plane will Yaw (slide from side to side) uncontrollably when you accelerate down the runway.
- Check your Engine RPMs are maximum (just to make sure). We’re going to need all the power we can get in order to pull this bird off the ground.
- Check if you did set your flaps to 20% (YOU MUST CUSTOMIZE THIS FEATURE IN GAME, default if 0 or 100%, so DONT use it if you dont have it customized).
- Finally, return your throttle to its lowest setting, depress both wheel brakes (Z & X), and start your engine (E). The engines should come to life pretty much instantly, but occasionally you have to wait a little until they both are started up.
Takeoff
This is the HARDEST part of flying. To be successful you need to follow this guide closely.
- When you're ready to roll, keep the wheel brakes depressed while you increase your throttle to 100%. Once the engines are up to speed the plane will start to pull forward (even with the brakes depressed).
- Now release the brakes and the plane will start to roll.
- The Takeoff Roll is very tricky until liftoff because your rudder is not very strong to counter the drag of the main wheels. Try pushing a grocery cart from the opposite end for a real life example! The plane will Yaw to one side and the other when you’re getting up speed. A SLIGHT amount of right rudder is necessary to counteract this motion. Often small amounts of alternating rudder is necessary to keep the plane pointed straight down the runway. You could also use the wheel brakes if you must to keep you going in the right direction, but this will slow you down and will affect your ability to get up to speed.
- You’re aiming for a takeoff speed of AT LEAST 150 km/h before you start to pull up off the runway. Once you’re up to speed, apply slight pressure backwards on the stick, and ease the plane off the ground.
- DO NOT JERK ON THE STICK, It will only take a little back pressure, and the airplane will start to climb on its own as you gain speed. You’re just trying to get far enough off the ground to clear the trees. You will be right around the planes stall speed, so fly straight for a little bit to build your speed.
- As soon as you are off the ground, RAISE THE GEAR ('G' Key). You don't need that drag slowing you down.
- STAY LEVEL, SHALLOW CLIMB. Let the airplane continue to build speed, you will notice it will take less and less back pressure to maintain the shallow climb. You can start to do shallow turns at this point.
- Once you reach 200 km/h, retract your flaps up ('W' key). You will note the AoA will suddenly drop from about 2.0 to 1.2, and pull on the stick to keep the nose up.
- If you has correctly set the trim, then the airplane will easily settle to a nice climb of AoA=1.0 and speed about 250 km/h, needing no touching on the sick.
Gaining Altitude and Speed
- Once you're in the air, you’re going to want to climb and gain some altitude. Normally you should stay at MAX Engine RPM’s until you’ve got some altitude (about a KM or so). If you’re forming up with a flight of other bombers, ask the flight leader what the engine settings he will be flying at are. Typical lead climb may be MAX/1.2ata, around 235 km/h
- Its important to keep your speed up and take your time while climbing. The HE111 actually flies pretty nicely once its off the ground, and is quite a stable plane, unless you get too close to stall speed. A good rule of thumb is that 150 km/h is about the lowest speed you want to reach.
Flight To Target
- If you're flying with a group, the most important thing is to stay with the rest of the bombers. Ask the flight leader what engine settings you should use, but don’t be afraid to go faster or slower as need be to stay with the group. If you find yourself falling behind at what you expect is the right speed, then check your flaps are all retracted and your engine RPM’s are set correctly.
- Setting the correct trim on your plane is vitally important for long flights. You want to pretty much be able to fly hands-off and only have to make minor corrections every once in a while. Until you get up to your cruising speed, you will probably have to adjust the trim every once in a while. You can also use the autopilot ('A' key) once you are flying straight and level. This will keep you flying in a straight line at a constant altitude. If you are not multi-crewing the plane, use this time to look around for enemy fighters.
Turns
Formation flying
Lining Up On Target
From A Far Distance
- Its important to know the position of the target you are going to bomb ahead of time. You want to line up as best you can before you get close to the target. The best thing is if you know the Latitude or longitude of the target, and you can line up along one of these and follow a straight line in.
- If you don't know the latitude and longitude, then try to line yourself up with the roads or terrain you know is around. For instance, if you’re bombing an AB, you know the town will probably be near a road intersection, and you can line up on one of these roads on the way in. Rivers, large forests and other landmarks also make it easier to get lined up.
Near Target
- Once the target is on map, you're about ready to start seriously lining it up.
- One of the most important things in this period is to communicate with your bombardier. The next important thing is to hold the plane steady ?, the bombardier will have trouble making the settings he needs to if you can’t hold the plane level and at a constant speed.
- One of the more recent tools for providing feedback to the pilots from the bombardier is the "Course Pointer" ("Kurszeiger") (Labeled #3 on the cockpit diagram). This indicates the amount to the left or right that you need to change your direction to be lined up with the target. As you move towards the target, the bombardier should keep the target directly in the bombsight so that you can see when you’re lined up.
- Note: I find that the best thing to do, is to keep the plane as level as you can, and adjust your heading using your rudder only. If you roll the plane from side to side (as you would in a normal turn), then the bombsight will not indicate the correct heading. Also, if you pull the plane nose-up or nose-down, then the bombadier will drop prematurely or too late.
- Once you’re on target, keep the plane as steady as you can. Hold it straight and level. And wait till the bombardier indicates that he has dropped.
- If you miss target, or the bombardier didn’t unload the entire bomb load in the first pass, continue for a few seconds flying straight. Resist the urge to start turning immdietly, you want a nice long steady straight approach to the target so take your time and get a good distance away then circle around as level as you can and line up again. It may take a few tries until you get a good pass.
Using the "Course Pointer" ("Kurszeiger"), a.k.a "PDI"
Called the "Course Pointer" (original German "Kurszeiger") by the Luftwaffe, its American USAAF counterpart is called the "PDI", an acronym for "Pilot Directional Indicator", what the DB-7 would have. Manipulating the 'PDI' is described in detail later. Essentially it is a tool by which the bombadier can indicate to the pilot how far he should turn to the left or right in order to fly straight over the target. The pilot of the plane only needs to know how to read the indicator in order to get the plane lined up for the bombing run. The limits of the range for the indicator is 22.5 degrees to either side, or 1/16 of the compass circle.
The following picture indicates that the pilot should turn to the right.
This picture indicates that the pilot is correctly lined up with the target.
Lining Up By Eye
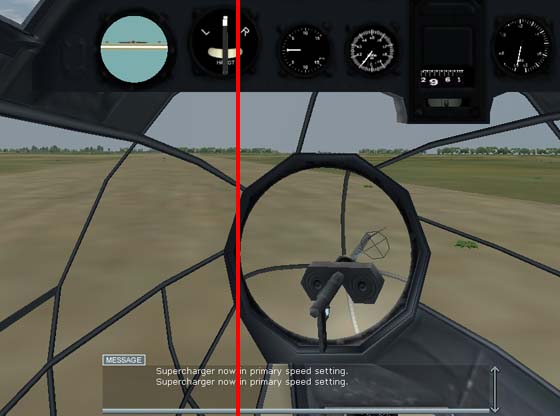
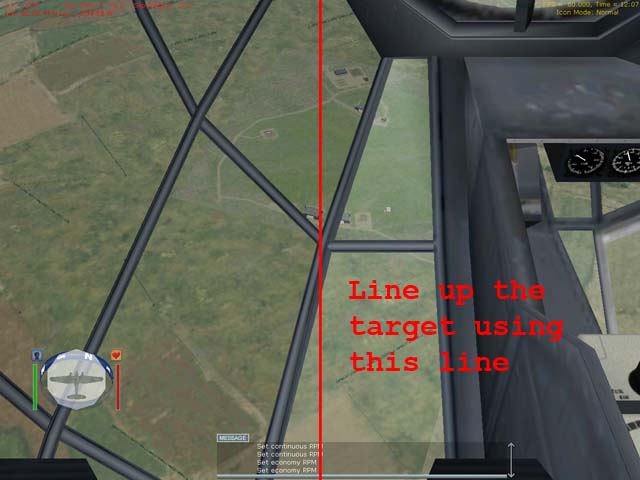
When you are flying solo, there is seldom time to switch back and forth between the bombadier and pilot in order to use the target heading indicator correctly. A method which works quite well in order to assist lining the plane up over the target is to use parts of the cockpit as a reference. If you line the target up on the red line pictured here,
Then you are going to pass quite close over the target.
This is a view from the pilots seat, using the 'look down' key to get a better view of the target when it is close.
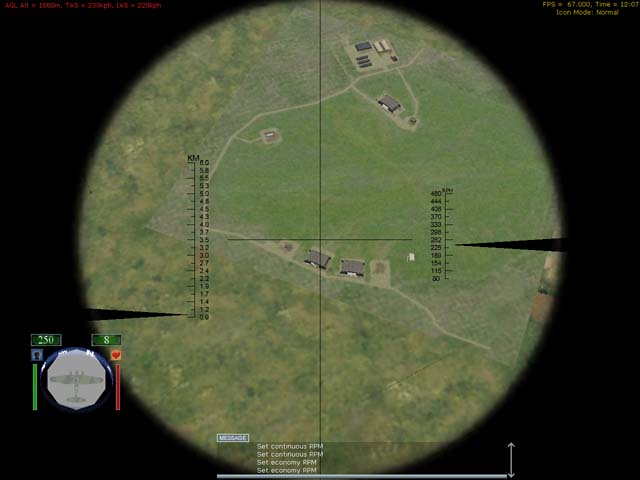
Here's a shot of how the target (lined up in the above image) looks through the bombsight. Note that the vertical line in the bombsight is pretty much the same as the highlighted red line.
Return Flight
- The return flight will be much like the flight in. I'd recommend that you try to stay with the rest of your flight, there is safety in numbers. However, some of the time the group falls apart after you get to target, and many people need to take repeated passes at the target.
- If you get separated from the group, get away as fast as you can. Drop some altitude to get some speed, and head back to the nearest Bomber Field.
- If you were bombing RDP, then it is normally safer to stay up high, as you’ll be flying back over allied territory.
Landing
- If you've made it this far, then you're probably not going to have trouble landing the 111. The most important thing is to get lined up on the runway so that you won't overshoot and crash.
- Drop your altitude early so that you're not going too fast on your approach, and don't be afraid to pull out of a landing approach if you're going too fast. Its better to have to go around the airfield again than crash into a tree :).
- You’re going to want to be going at about 200 km/h on your approach. Drop altitude and pull back on the throttle do that you loose speed. I drop about 50% flaps when I'm still a ways out, and then increase to 100% flaps as I get closer.
- Drop your RPMs to continuous as you approach the runway, and try to come in as level as you can. Once you touch down, turn off your engines, and begin to brake to slow yourself.
- Use alternating right and left brake in order to slow yourself down. Once you’re at a slow enough speed you can kick in both brakes to stop yourself.
- Many people suggest landing gear-up with the 111, as you will slow much more quickly and run less risk of overshooting the runway. I personally prefer to land with the gear-down, as its good practice :).
Guides
Level Bombing with Bombers
Resources
Dated but still good source of information: Thunderace He-111 Guide
| Air Units in Battleground Europe | |
|---|---|
| Fighters and fighter bombers | |
| Bf 109E-1 | Bf 109E-4| Bf 109E-4B |Bf 109F-2 | Bf 109F-4 | Bf 109G-2/R1| Bf 109G-6/U4 | Bf 110C-4 | Bf 110C-4/B | Blenheim IF | Dewoitine D.520 | Fw 190A-3B | Fw 190A-4 | Hawk 75 | Hawk 81 | Hawk 87 | P-40F Kittyhawk Fighter Bomber | | Hurricane Mk I | Hurricane Mk IIb | Hurricane Mk IIc | Hurricane Mk IID | Junkers 87G2 'Stuka' | P-38 'Lightning' | Bell Model 14a / P-400 Airacobra | Model 26 / P-39N Airacobra | Spitfire Mk Ia | Spitfire Mk IIb | Spitfire Mk Vb | Spitfire Mk IXc | |
| Bombers | |
| Blenheim IV | Douglas DB-7 | Havoc Mk.I | A20C Havoc | Heinkel 111 | Junkers Ju 88A4 | Junkers 87 'Stuka' | | |
| Transport | |
| C47 'Skytrain' | Junkers 52 | |
