Difference between revisions of "Multicrew"
| Line 22: | Line 22: | ||
Ships and Boats unlike Armour/Aircraft are a little different when multicrewing. The multicrew Commander will always be the helmsman (Position 1) but can also hold other positions for example Anti-Air Gunner or Torpedo Launcher Controller. | Ships and Boats unlike Armour/Aircraft are a little different when multicrewing. The multicrew Commander will always be the helmsman (Position 1) but can also hold other positions for example Anti-Air Gunner or Torpedo Launcher Controller. | ||
Below are the different configurations for each naval vessel. | Below are the different configurations for each naval vessel. | ||
===Destroyer=== | |||
*Position 1. Helmsman - Not much explanation required, from here you can turn the Engine On/Off and navigate the Boat. | |||
*Position 2. Lookout - This Crew is Equipped with Binoculars. | |||
*Position 3. Forward Fire Control - This Position would be the 3 Forward facing 128mm Deck Guns. Using the Primary Fire Key would command the 2 Bow (Front) Deck Guns while the Secondary Fire Key would use the Aft (rear) forward facing Deck Gun. | |||
*Position 4. Bow Anti-Air Gunner - This Controller commands 2x 20mm Anti-Air Gun, Primary Fire Key would command the Port (Left) Anti-Air Guns | |||
*Position 5. Aft Anti-Air Gunner - Again this Controller commands 2x 20mm Anti-Air Gun, Primary Fire Key would fire the forward gun and the Secondary Fire Key the rear Gun. | |||
*Position 6. Port/Starboard Fire Controller - The Controller commands 2x 37mm Deck Guns. Primary Fire Key would fire the Starboard gun and the Secondary Fire Key the Port Gun. | |||
*Position 7. Rear Fire Control - This Position would be the 2 Rear facing 128mm Deck Guns. Using the Primary Fire Key would command the rear most Deck Guns while the Secondary Fire Key would use the other. | |||
*Position 8. Torpedo Controller - This would control the 2x 533mm Torpedo launchers. The Primary Fire Key would command the forward most launcher while the Secondary Fire Key would use the rear most. | |||
===Armed Trawler=== | |||
*Position 1. Helmsman - Not much explanation required, from here you can turn the Engine On/Off and navigate the Boat. | |||
*Position 2. Lookout - This Crew is Equipped with Binoculars. | |||
*Position 3. Forward Deck Gun - This Position would be the 76mm Anti-Tank Gun. | |||
*Position 4. Starboard Anti-Air Gunner - Stood on the Right side side of the Ship (Starboard) controlling Twin 20mm AA Gun. | |||
*Position 5. Port Anti-Air Gunner - Stood on the Left side side of the Ship (Port) controlling Twin 20mm AA Gun. | |||
*Position 6. Rear Anti-Air Gunner - Equipped this time with a Quad QF 2pdr Pom-Pom AA Cannon. | |||
===Fairmile B=== | ===Fairmile B=== | ||
| Line 32: | Line 52: | ||
*Position 6. Rear AA Gun - Eqiupped this time with a Dual 20mm Anti-Air Gun. | *Position 6. Rear AA Gun - Eqiupped this time with a Dual 20mm Anti-Air Gun. | ||
*Position 7. Port Machine Gunner - A .303cal LMG covering the Left Side. | *Position 7. Port Machine Gunner - A .303cal LMG covering the Left Side. | ||
*Position 8. Starboard Machine Gunner - A .303cal LMG covering the Right Side. | *Position 8. Starboard Machine Gunner - A .303cal LMG covering the Right Side. | ||
===Freighter=== | |||
*Position 1. Helmsman - Not much explanation required, from here you can turn the Engine On/Off and navigate the Boat. | |||
*Position 2. Port Lookout - Stood on the Left side of the Ship (Port) this Crew is Equipped with Binoculars. | |||
*Position 3. Crane Operator - Used to board Armour and Trucks into the hull of the Ship. Also Controls Lifeboats so Infantry can board. | |||
*Position 4. Backup Helmsman - Back up to Position 1. | |||
*Position 5. Starboard Lookout - Stood on the Right side side of the Ship (Starboard) this Crew is Equipped with Binoculars. | |||
*Position 6. Forward Gunner - 2x 20mm Anti-Air Guns. | |||
*Position 7. Rear Gunner - 2x 20mm Anti-Air Guns. | |||
*Position 8. Backup Helmsman - Back up to Position 1. | |||
=Creating a Multicrew= | =Creating a Multicrew= | ||
Revision as of 05:14, 7 February 2024
Multicrew General
It is only possible for two Players to Multicrew a vehicle. Such Vehicles would be all Armoured Vehicles, Boats and Aircraft (have more than 1 position/not single seated airplanes).
The positions are not interchangeable, the player who initiates the Multicrew (Request Crew) would be the driver (Position 1) and the Hull Gunner (Position 4) if Hull Gunner available and the Player who joins the Vehicle (Join Vehicle) would be the Gunner (Position 3) and Commander (Position 2).
Multicrew Vehicle Types
Vehicles types Armour, Aircraft and Ships have different multicrew positions and will be defined here.
Armour
Most Armour have the same Position types: Driver, Gunner, Commander and in some cases Hull Gunner.
The Commander of the Multicrew would hold positions 1 (Driver) and 4 (Hull Gunner), the Multicrew Crewman would hold positions 2 (Commander) and 3 (Gunner).
Aircraft
Like Armour, Aircraft have the same Position Types: Pilot, Bombardier and Air Gunner. The Commander of the Multicrew would hold positions 1 (Pilot), while the Multicrew Crewman would hold positions 2 (Bombardier) and 3 (Air Gunner).
Ships/Boats
Ships and Boats unlike Armour/Aircraft are a little different when multicrewing. The multicrew Commander will always be the helmsman (Position 1) but can also hold other positions for example Anti-Air Gunner or Torpedo Launcher Controller. Below are the different configurations for each naval vessel.
Destroyer
- Position 1. Helmsman - Not much explanation required, from here you can turn the Engine On/Off and navigate the Boat.
- Position 2. Lookout - This Crew is Equipped with Binoculars.
- Position 3. Forward Fire Control - This Position would be the 3 Forward facing 128mm Deck Guns. Using the Primary Fire Key would command the 2 Bow (Front) Deck Guns while the Secondary Fire Key would use the Aft (rear) forward facing Deck Gun.
- Position 4. Bow Anti-Air Gunner - This Controller commands 2x 20mm Anti-Air Gun, Primary Fire Key would command the Port (Left) Anti-Air Guns
- Position 5. Aft Anti-Air Gunner - Again this Controller commands 2x 20mm Anti-Air Gun, Primary Fire Key would fire the forward gun and the Secondary Fire Key the rear Gun.
- Position 6. Port/Starboard Fire Controller - The Controller commands 2x 37mm Deck Guns. Primary Fire Key would fire the Starboard gun and the Secondary Fire Key the Port Gun.
- Position 7. Rear Fire Control - This Position would be the 2 Rear facing 128mm Deck Guns. Using the Primary Fire Key would command the rear most Deck Guns while the Secondary Fire Key would use the other.
- Position 8. Torpedo Controller - This would control the 2x 533mm Torpedo launchers. The Primary Fire Key would command the forward most launcher while the Secondary Fire Key would use the rear most.
Armed Trawler
- Position 1. Helmsman - Not much explanation required, from here you can turn the Engine On/Off and navigate the Boat.
- Position 2. Lookout - This Crew is Equipped with Binoculars.
- Position 3. Forward Deck Gun - This Position would be the 76mm Anti-Tank Gun.
- Position 4. Starboard Anti-Air Gunner - Stood on the Right side side of the Ship (Starboard) controlling Twin 20mm AA Gun.
- Position 5. Port Anti-Air Gunner - Stood on the Left side side of the Ship (Port) controlling Twin 20mm AA Gun.
- Position 6. Rear Anti-Air Gunner - Equipped this time with a Quad QF 2pdr Pom-Pom AA Cannon.
Fairmile B
- Position 1. Helmsman - Not much explanation required, from here you can turn the Engine On/Off and navigate the Boat.
- Position 2. Port Lookout - Stood on the Left side of the Ship (Port) this Crew is Equipped with Binoculars.
- Position 3. Forward Deck Gun - This Position would be the 3 Pdr/47mm Anti-Tank Gun.
- Position 4. Forward AA Gun - Single 20mm Anti-Air Gun, found in the middle of the Boat.
- Position 5. Starboard Lookout - Stood on the Right side side of the Ship (Starboard) this Crew is Equipped with Binoculars.
- Position 6. Rear AA Gun - Eqiupped this time with a Dual 20mm Anti-Air Gun.
- Position 7. Port Machine Gunner - A .303cal LMG covering the Left Side.
- Position 8. Starboard Machine Gunner - A .303cal LMG covering the Right Side.
Freighter
- Position 1. Helmsman - Not much explanation required, from here you can turn the Engine On/Off and navigate the Boat.
- Position 2. Port Lookout - Stood on the Left side of the Ship (Port) this Crew is Equipped with Binoculars.
- Position 3. Crane Operator - Used to board Armour and Trucks into the hull of the Ship. Also Controls Lifeboats so Infantry can board.
- Position 4. Backup Helmsman - Back up to Position 1.
- Position 5. Starboard Lookout - Stood on the Right side side of the Ship (Starboard) this Crew is Equipped with Binoculars.
- Position 6. Forward Gunner - 2x 20mm Anti-Air Guns.
- Position 7. Rear Gunner - 2x 20mm Anti-Air Guns.
- Position 8. Backup Helmsman - Back up to Position 1.
Creating a Multicrew
There are actions to be made by both players to join crews. For simplicity I will run it a logical format from each players perspective.
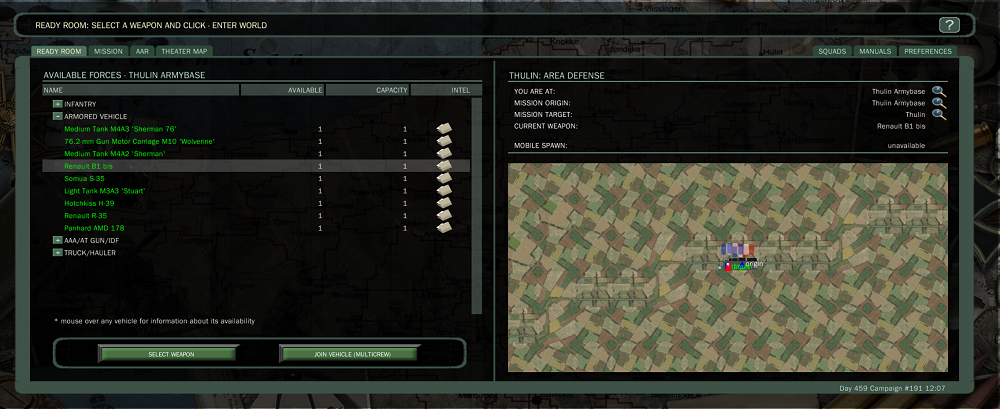
- Player 1- Selects the vehicle to be used from the Ready Room, Click on the Vehicle you want and one time click "Select Weapon".
|
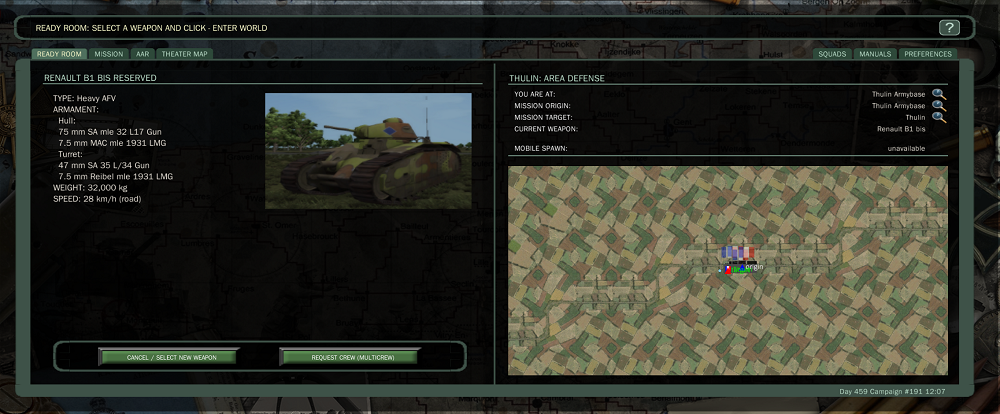
- Player 1- This would bring you to the page seen below, you can then click on Request Crew (Multicrew)
|
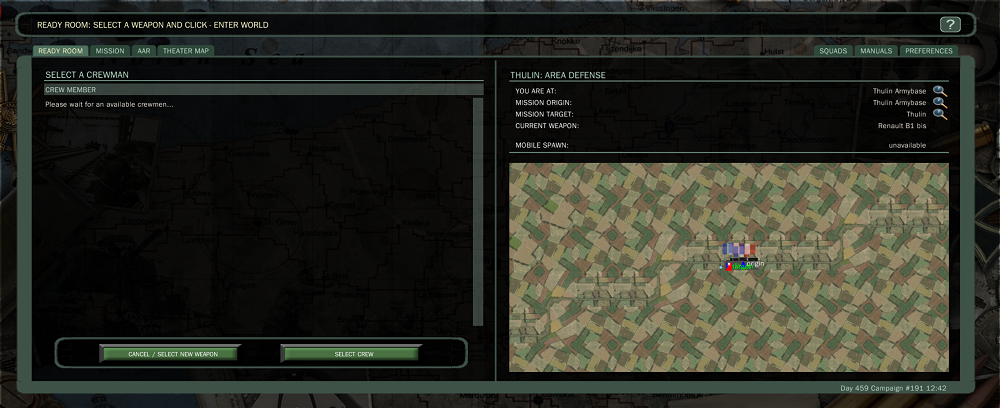
- Player 1- You would then wait at the next page "Select a Crewman", this would populate with Player 2 Gamename once he has completed his selections.
|
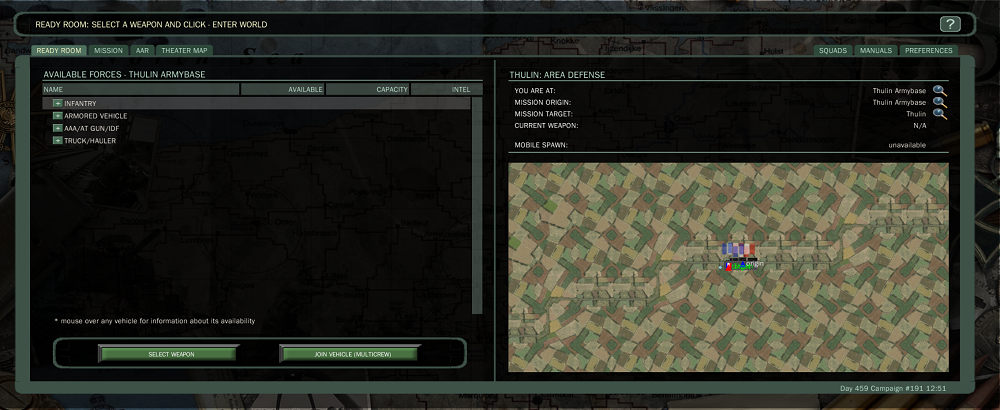
- Player 2 from the Ready Room does not select a vehicle, simply selects "Join Vehicle (Multicrew)".
|
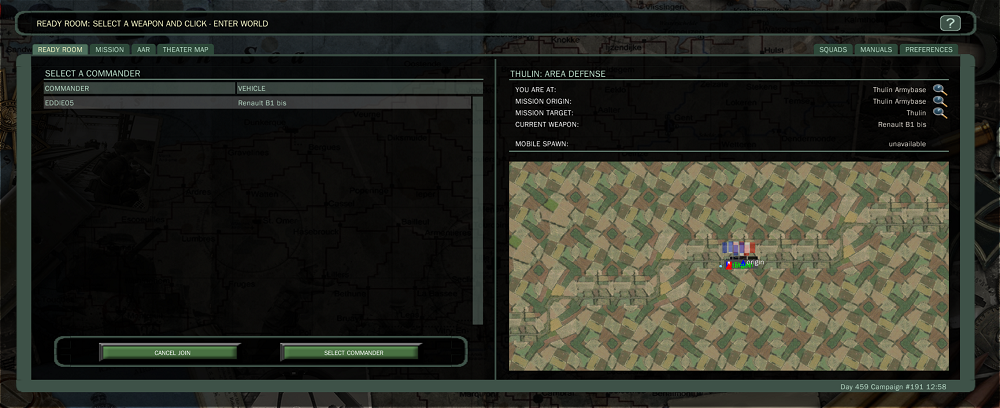
- Player 2- If Player 1 has completed his selection of Vehicle and clicked "Select a Crewman" then Player 1 name and Vehicle would populate in the list. Player 2 would then select the name and click "Select Commander". Nothing would happen for Player 2 until Player 1 completes the selection.
|
- Player 1 would now see Player 2 name in his list and click on the button "Select Crew"

|
- Player 1 would now see the following below, notice the "Enter World" Button is Green.

|
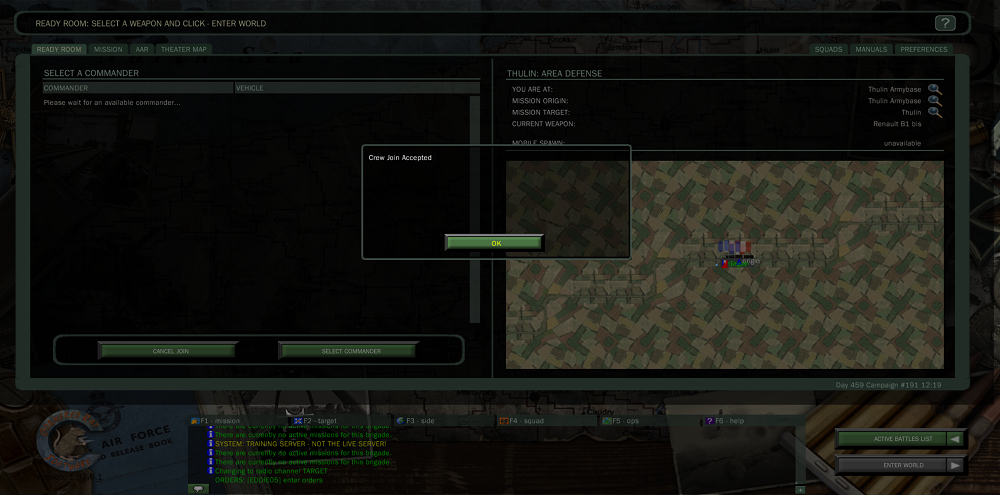
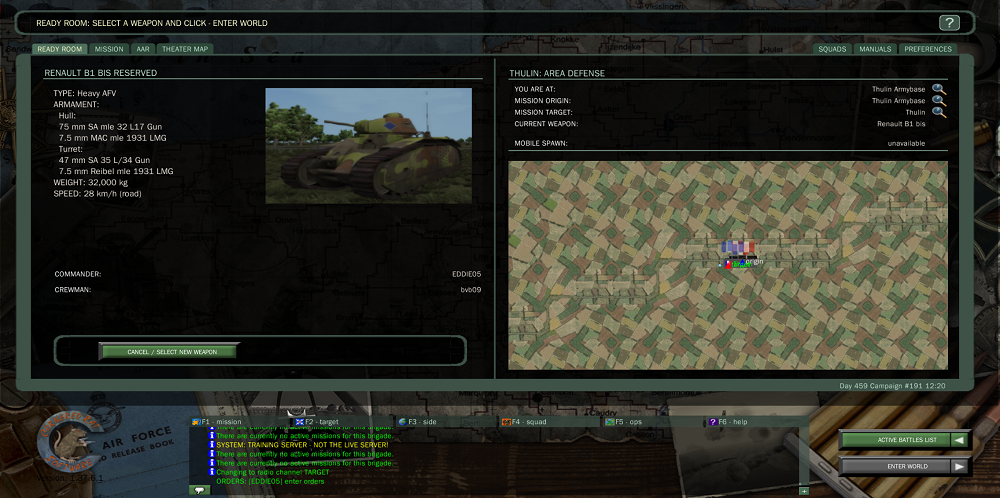
- Player 2 would then see a Dialogue Box "Crew Join Accepted" clicking OK would then show the follow below notice he cannot select "Enter World" as its greyed out. At this stage once Player 1 selects Enter World they would both enter the game.
|
|